Extending your Pipeline with Shared Libraries, Global Functions and External Code
| This is a guest post by Brent Laster, Senior Manager, Research and Development at SAS. |
Jenkins Pipeline
has fundamentally changed how users can orchestrate their pipelines and workflows.
Essentially, anything that you can do in a script or program can now be done in a Jenkinsfile or in a pipeline script created within the application.
But just because you can do nearly anything directly in those mechanisms doesn’t mean you necessarily should.
In some cases, it’s better to abstract the functionality out separately from your main Pipeline. Previously, the main way to do this in Jenkins itself was through creating plugins. With Jenkins 2 and the tight incorporation of Pipeline, we now have another approach – shared libraries.
|
Brent will be
presenting
more of this topic at Jenkins World in
August, register with the code |
Shared libraries provide solutions for a number of situations that can be challenging or time-consuming to deal with in Pipeline. Among them:
-
Providing common routines that can be accessed across a number of pipelines or within a designated scope (more on scope later)
-
Abstracting out complex or restricted code
-
Providing a means to execute scripted code from calls in declarative pipelines (where scripted code is not normally allowed)
-
Simplifying calls in a script to custom code that only differ by calling parameters
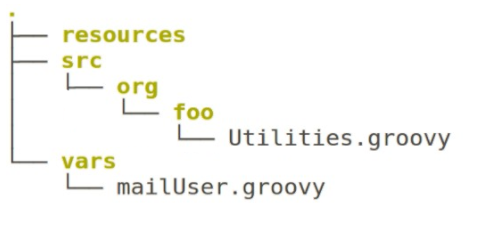
To understand how to use shared libraries in Pipeline, we first need to understand how they are constructed. A shared library for Jenkins consists of a source code repository with a structure like the one below:

Each of the top-level directories has its own purpose.
The resources directory can have non-groovy resources that get loaded via the libraryResource step.
Think of this as a place to store supporting data files such as json files.
The src directory uses a structure similar to the standard Java src layout.
This area is added to the classpath when a Pipeline that includes this shared library is executed.
The vars directory holds global variables that should be accessible from pipeline scripts.
A corresponding .txt file can be included that defines documentation for objects here.
If found, this will be pulled in as part of the documentation in the Jenkins application.
Although you might think that it would always be best to define library functions in the src structure, it actually works better in many cases to define them in the vars area. The notion of a global variable may not correspond very well to a global function, but you can think of it as the function being a global value that can be pulled in and used in your pipeline. In fact, to work in a declarative style pipeline, having your function in the vars area is the only option.
Let’s look at a simple function that we can create for a shared library. In this case, we’ll just wrap picking up the location of the Gradle installation from Jenkins and calling the corresponding executable with whatever tasks are passed in as arguments. The code is below:
def call(args) {
      sh "${tool 'gradle3'}/bin/gradle ${args}"
}
Notice that we are using a structured form here with the def call syntax. This allows us to simply invoke the routine in our pipeline (assuming we have loaded the shared library) based on the name of the file in the vars area. For example, since we named this file gbuild.groovy, then we can invoke it in our pipeline via a step like this:
gbuild 'clean compileJava'So, how do we get our shared library loaded to use in our pipeline?
The shared library itself is just code in the structure outlined above committed/pushed into a source code repository that Jenkins can access.
In our example, we’ll assume we’ve staged, committed, and pushed this code into a local Git repository on the system at /opt/git/shared-library.git.
Like most other things in Jenkins, we need to first tell Jenkins where this shared library can be found and how to reference it "globally" so that pipelines can reference it specifically.
First, though, we need to decide at what scope you want this shared library to be available. The most common case is making it a "global shared library" so that all Pipelines can access it. However, we also have the option of only making shared libraries available for projects in a particular Jenkins Folder structure, or those in a Multibranch Pipeline, or those in a GitHub Organization pipeline project.
To keep it simple, we’ll just define ours to be globally available to all pipelines. Doing this is a two-step process. We first tell Jenkins what we want to call the library and define some default behavior for Jenkins related to the library, such as whether we wanted it loaded implicitly for all pipelines. This is done in the Global Pipeline Libraries section of the Configure System page.

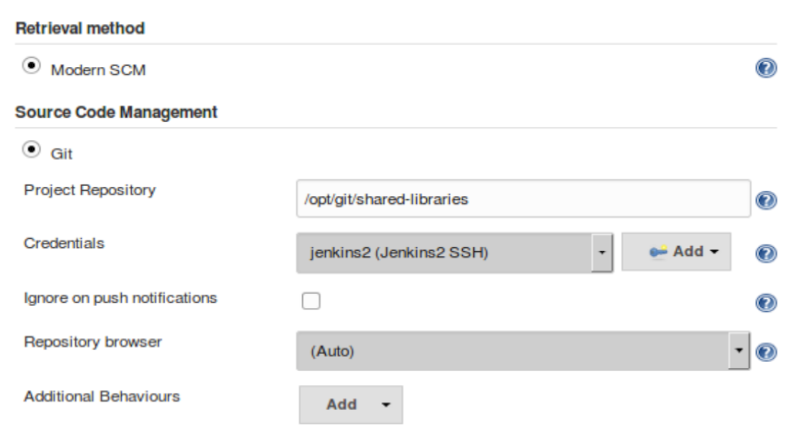
For the second part, we need to tell Jenkins where the actual source repository for the shared library is located. SCM plugins that have been modified to understand how to work with shared libraries are called "Modern SCM". The git plugin in one of these updated plugin, so we just supply the information in the same Configure System page.

After configuring Jenkins so that it can find the shared library repository, we can load the shared library into our pipeline using the @Library('<library name>') annotation.
Since Annotations
are designed to annotate something that follows them,
we need to either include a specific import statement, or, if we want to include everything, we can use an underscore character as a placeholder.
So our basic step to load the library in a pipeline would be:
@Library('Utilities2') _Based on this step, when Jenkins runs our Pipeline, it will first go out to the repository that holds the shared library and clone down a copy to use. The log output during this part of the pipeline execution would look something like this:
Loading library Utilities2@master
 > git rev-parse --is-inside-work-tree # timeout=10
Setting origin to /opt/git/shared-libraries
 > git config remote.origin.url /opt/git/shared-libraries # timeout=10
Fetching origin...
Fetching upstream changes from origin
 > git --version # timeout=10
using GIT_SSH to set credentials Jenkins2 SSH
 > git fetch --tags --progress origin +refs/heads/*:refs/remotes/origin/*
 > git rev-parse master^{commit} # timeout=10
 > git rev-parse origin/master^{commit} # timeout=10
Cloning the remote Git repository
Cloning repository /opt/git/shared-libraries
Then Pipeline can call our shared library gbuild function and translate it to the desired Gradle build commands.
First time build.
Skipping changelog.
[Pipeline] }
[Pipeline] // stage
[Pipeline] stage
[Pipeline] { (Compile)
[Pipeline] tool
[Pipeline] sh
[gsummit17_lab2-4T357CUTJORMC2TIF7WW5LMRR37F7PM2QRUHXUNSRTWTTRHB3XGA]
Running shell script
+ /usr/share/gradle/bin/gradle clean compileJava -x test
Starting a Gradle Daemon (subsequent builds will be faster)
This is a very basic illustration of how using shared libraries work. There is much more detail and functionality surrounding shared libraries, and extending your pipeline in general, than we can cover here.
Be sure to catch my talk on Extending your Pipeline with Shared Libraries, Global Functions and External Code at Jenkins World 2017. Also, watch for my new book on Jenkins 2 Up and Running which will have a dedicated chapter on this – expected to be available later this year from O’Reilly.
