Multi-branch Pipeline Jobs Support for GitLab SCM
This is one of the Jenkins project in GSoC 2019. We are working on adding support for Multi-branch Pipeline Jobs and Folder Organisation in GitLab. The plan is to create the following plugins:
-
GitLab API Plugin - Wraps GitLab Java APIs.
-
GitLab Branch Source Plugin - Contains two packages:
-
io.jenkins.plugins.gitlabserverconfig- Manages server configuration and web hooks management. Ideally should reside inside another plugin with nameGitLab Plugin. In future, this package should be moved into a new plugin. -
io.jenkins.plugins.gitlabbranchsource- Adds GitLab Branch Source for Multi-branch Pipeline Jobs (including Merge Requests) and Folder organisation.
-
Present State
-
FreeStyle Job and Pipeline(Single Branch) Job are fully supported.
-
Multi-branch Pipeline Job is partially supported (no MRs detection).
-
GitLab Folder Organisation is not supported.
Goals of this project
-
Implement a lightweight GitLab Plugin that depends on GitLab API Plugin.
-
Follow convention of 3 separate plugins i.e.
GitLab Plugin,GitLab API Plugin,GitLab Branch Source Plugin. -
Implement GitLab Branch Source Plugin with support for Multi-branch Pipeline Jobs.
-
Support new Jenkins features such as Jenkins Code as Configuration (JCasC), Incremental Tools.
-
Clear & Efficient design.
-
Support new SCM Trait APIs.
-
Support Java 8 and above.
Building the plugin
No binaries are available for this plugin as the plugin is in the very early alpha stage, and not ready for the general public quite yet. If you want to jump in early, you can try building it yourself from source.
Installation:
-
Checkout source code to your local machine:
git clone https://github.com/baymac/gitlab-branch-source-plugin.git

cd gitlab-branch-source-plugin-
Install the plugin:
mvn clean install

mvn clean install -DskipTests # to skip tests-
Run the plugin:
mvn hpi:run # runs a Jenkins instance at localhost:8080

mvn hpi:run -Djetty.port=<port> # to run on your desired port number
If you want to test it with your Jenkins server, after mvn clean install follow these steps in your Jenkins instance:
-
Select
Manage Jenkins -
Select
Manage Plugins -
Select
Advancedtab -
In
Upload Pluginsection, selectChoose file -
Select
$<root_dir>/target/gitlab-branch-source.hpi -
Select
Upload -
Select
Install without restart
Usage
Assuming plugin installation has done been already.
Setting up GitLab Server Configuration on Jenkins
-
On jenkins, select
Manage Jenkins -
Select
Configure System -
Scroll down to find the
GitLabsection
-
Select
Add GitLab Server| SelectGitLab Server -
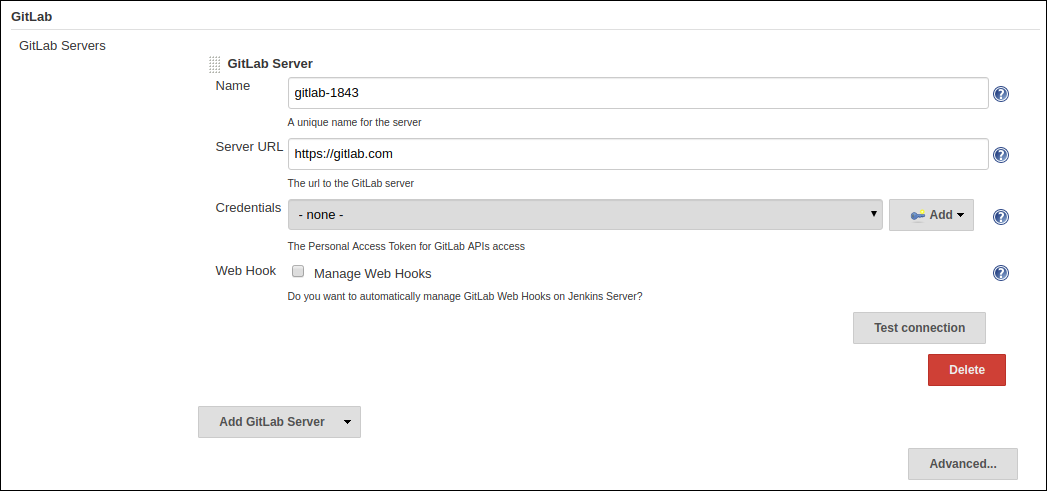
Now you will now see the GitLab Server Configuration options.

There are 4 fields that needs to be configured:
-
Name- Plugin automatically generates an unique server name for you. User may want to configure this field to suit their needs but should make sure it is sufficiently unique. We recommend to keep it as it is. -
Server URL- Contains the URL to your GitLab Server. By default it is set to "https://gitlab.com". User can modify it to enter their GitLab Server URL e.g. https://gitlab.gnome.org/, http://gitlab.example.com:7990. etc. -
Credentials- Contains a list of credentials entries that are of type GitLab Personal Access Token. When no credential has been added it shows "-none-". User can add a credential by clicking "Add" button. -
Web Hook- This field is a checkbox. If you want the plugin to setup a webhook on your GitLab project(s) related jobs, check this box. The plugin listens to a URL for the concerned GitLab project(s) and when an event occurs in the GitLab Server, the server sends an event trigger to the URL where the web hook is setup. If you want continuous integration (or continuous delivery) on your GitLab project then you may want to automatically set it up.
-
-
Adding a Personal Access Token Credentials (To automatically generate Personal Access Token see next section):
-
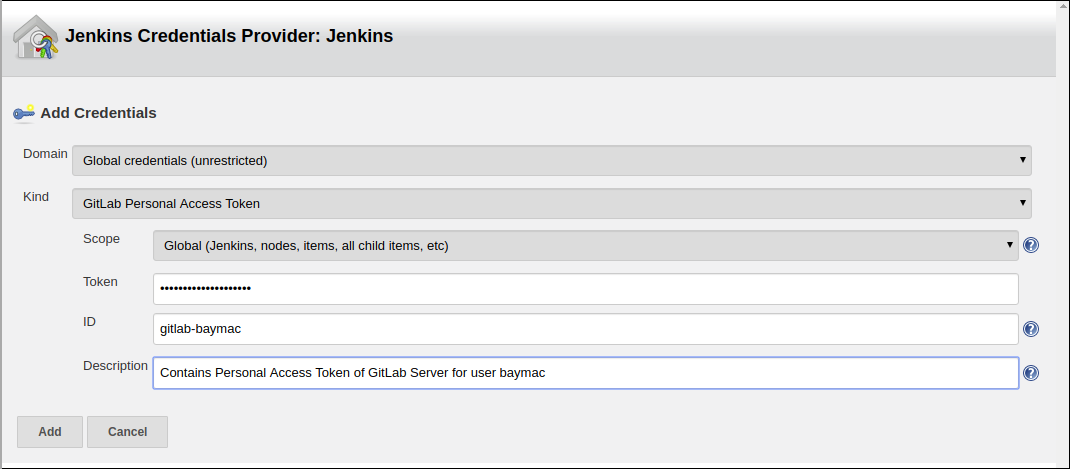
User is required to add a
GitLab Personal Access Tokentype credentials entry to securely persist the token inside Jenkins. -
Generate a
Personal Access Tokenon your GitLab Server:-
Select profile dropdown menu from top-right corner
-
Select
Settings -
Select
Access Tokenfrom left column -
Enter a name | Set Scope to
api,read_user,read_repository -
Select
Create Personal Access Token -
Copy the token generated
-
-
Return to Jenkins | Select
Addin Credentials field | SelectJenkins -
Set
Kindto GitLab Personal Access Token -
Enter
Token -
Enter a unique id in
ID -
Enter a human readable description
-
Select
Add
-
-
Testing connection:
-
Select your desired token in the
Credentialsdropdown -
Select
Test Connection -
It should return something like
Credentials verified for user <username>
-
-
Select
Apply(at the bottom) -
GitLab Server is now setup on Jenkins
Creating Personal Access Token within Jenkins
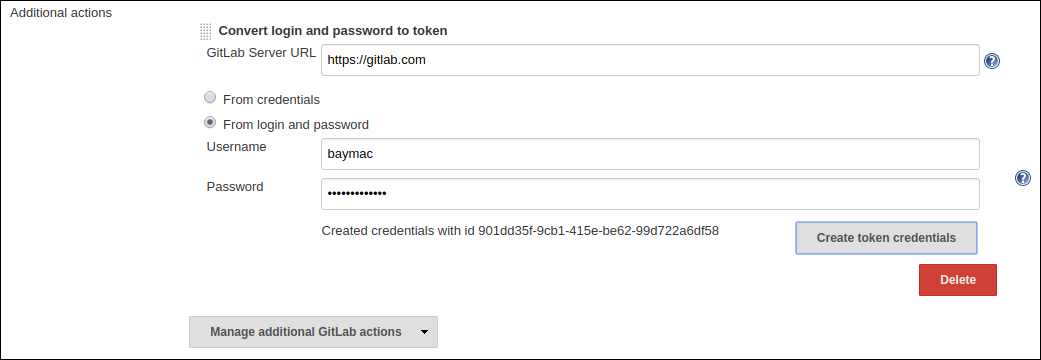
Alternatively, users can generate a GitLab Personal Access Token within Jenkins itself and automatically add the GitLab Personal Access Token credentials to Jenkins server credentials.
-
Select
Advancedat the bottom ofGitLabSection -
Select
Manage Additional GitLab Actions -
Select
Convert login and password to token -
Set the
GitLab Server URL -
There are 2 options to generate token;
-
From credentials- To select an already persisting Username Password Credentials or add an Username Password credential to persist it. -
From login and password- If this is a one time thing then you can directly enter you credentials to the text boxes and the username/password credential is not persisted.
-
-
After setting your username/password credential, select
Create token credentials. -
The token creator will create a Personal Access Token in your GitLab Server for the given user with the required scope and also create a credentials for the same inside Jenkins server. You can go back to the GitLab Server Configuration to select the new credentials generated (select "-none-" first then new credentials will appear). For security reasons this token is not revealed as plain text rather returns an
id. It is a 128-bit long UUID-4 string (36 characters).
Configuration as Code
No need for messing around in the UI. Jenkins Configuration as Code (JCasC) or simply Configuration as Code Plugin
allows you to configure Jenkins via a yaml file. If you are a first time user, you can learn more about JCasC
here.
Add configuration YAML:
There are multiple ways to load JCasC yaml file to configure Jenkins:
-
JCasC by default searches for a file with the name
jenkins.yamlin$JENKINS_ROOT. -
The JCasC looks for an environment variable
CASC_JENKINS_CONFIGwhich contains the path for the configurationyamlfile.-
A path to a folder containing a set of config files e.g.
/var/jenkins_home/casc_configs. -
A full path to a single file e.g.
/var/jenkins_home/casc_configs/jenkins.yaml. -
A URL pointing to a file served on the web e.g.
https://<your-domain>/jenkins.yaml.
-
-
You can also set the configuration yaml path in the UI. Go to
<your-jenkins-domain>/configuration-as-code. Enter path or URL tojenkins.yamland selectApply New Configuration.
An example of configuring GitLab server via jenkins.yaml:
credentials:
  system:
    domainCredentials:
      - credentials:
          - gitlabPersonalAccessToken:
              scope: SYSTEM
              id: "i<3GitLab"
              token: "XfsqZvVtAx5YCph5bq3r" # gitlab personal access token

unclassified:
  gitLabServers:
    servers:
      - credentialsId: "i<3GitLab"
        manageHooks: true
        name: "gitlab.com"
        serverUrl: "https://gitlab.com"
For better security, see handling secrets section in JCasC documentation.
Future Scope of work
The second phase of GSoC will be utilized to develop GitLab Branch Source. The new feature is a work in progress, but the codebase is unstable and requires lot of bugfixes. Some features like Multibranch Pipeline Jobs are functioning properly. More about it at the end of second phase.
Issue Tracking
This project uses Jenkins JIRA to track issues. You can file issues under
gitlab-branch-source-plugin component.
Acknowledgements
This plugin is built and maintained by the Google Summer of Code (GSoC) Team for
Multi-branch Pipeline
Support for GitLab. A lot of inspiration was drawn from GitLab Plugin, Gitea Plugin and GitHub Plugin.
Also thanks to entire Jenkins community for contributing with technical expertise and inspiration.