Introducing the Azure Key Vault Credentials Provider for Jenkins
Azure Key Vault is a product for securely managing keys, secrets and certificates.
I’m happy to announce two new features in the Azure Key Vault plugin:
-
a credential provider to tightly link Jenkins and Azure Key Vault.
-
huge thanks to Jie Shen for contributing this
-
-
integration with the configuration-as-code plugin.
These changes were released in v1.8 but make sure to run the latest version of the plugin, there has been some fixes since then.
Some advantages of using the credential provider rather than your own scripts:
-
your Jenkins jobs consume the credentials with no knowledge of Azure Key Vault, so they stay vendor-independent.
-
the provider integrates with the ecosystem of existing Jenkins credential consumers, such as the Slack Notifications plugin.
-
credential usage is recorded in the central Jenkins credentials tracking log.
-
Jenkins can use multiple credentials providers concurrently, so you can incrementally migrate credentials to Azure Key Vault while consuming other credentials from your existing providers.
Note: Currently only secret text credentials are supported via the credential provider, you can use the configuration-as-code integration to load the secret from Azure Key Vault into the System Credential Provider to work around this limitation.
Getting started
Install the Azure Key Vault plugin
Then you will need to configure the plugin.
Azure authentication
There’s two types of authentication you can use 'Microsoft Azure Service Principal' or 'Managed Identities for Azure Resources'
The easiest one to set this up quickly with is the 'Microsoft Azure Service Principal',
$ az ad sp create-for-rbac --name http://service-principal-name
Creating a role assignment under the scope of "/subscriptions/ff251390-d7c3-4d2f-8352-f9c6f0cc8f3b"
  Retrying role assignment creation: 1/36
  Retrying role assignment creation: 2/36
{
  "appId": "021b5050-9177-4268-a300-7880f2beede3",
  "displayName": "service-principal-name",
  "name": "http://service-principal-name",
  "password": "d9d0d1ba-d16f-4e85-9b48-81ea45a46448",
  "tenant": "7e593e3e-9a1e-4c3d-a26a-b5f71de28463"
}
If this doesn’t work then take a look at the Microsoft documentation for creating a service principal.
Note: for production 'Managed Identities for Azure Resources' is more secure as there’s no password involved and you don’t need to worry about the service principal’s password or certificate expiring.
Vault setup
You need to create a vault and give your service principal access to it:
RESOURCE_GROUP_NAME=my-resource-group
az group create --location uksouth --name $RESOURCE_GROUP_NAME

VAULT=my-vault # you will need a unique name for the vault
az keyvault create --resource-group $RESOURCE_GROUP_NAME --name $VAULT
az keyvault set-policy --resource-group $RESOURCE_GROUP_NAME --name $VAULT \
  --secret-permissions get list --spn http://service-principal-name
Jenkins credential
The next step is to configure the credential in Jenkins:
-
click 'Credentials'
-
click 'System' (it’ll appear below the Credentials link in the side bar)
-
click 'Global credentials (unrestricted)'
-
click 'Add Credentials'
-
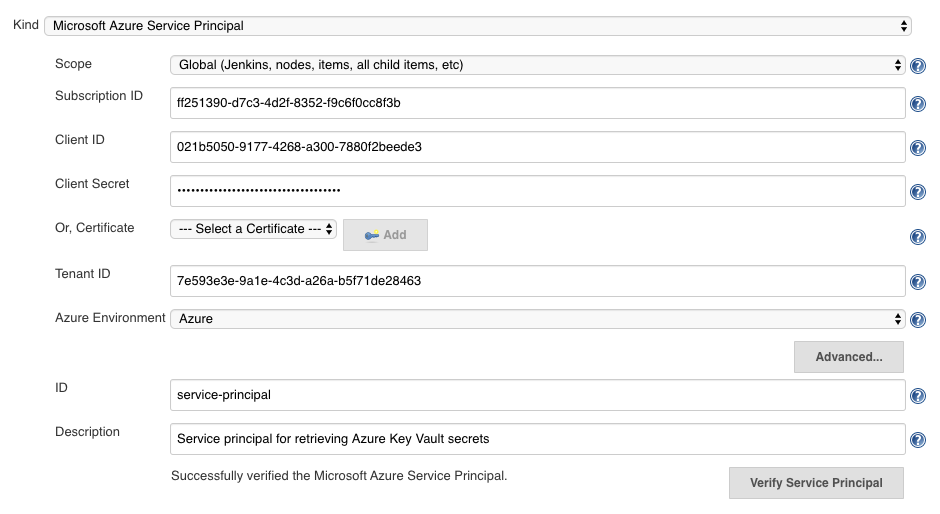
select 'Microsoft Azure Service Principal'

-
fill out the form from the credential created above, appId is 'Client ID', password is 'Client Secret'

-
click 'Verify Service Principal', you should see 'Successfully verified the Microsoft Azure Service Principal'.
-
click 'Save'
Jenkins Azure Key Vault plugin configuration
You now have a credential you can use to interact with Azure resources from Jenkins, now you need to configure the plugin:
-
go back to the Jenkins home page
-
click 'Manage Jenkins'
-
click 'Configure System'
-
search for 'Azure Key Vault Plugin'
-
enter your vault url and select your credential

-
click 'Save'
Store a secret in Azure Key Vault
For the step after this you will need a secret, so let’s create one now:
$ az keyvault secret set --vault-name $YOUR_VAULT --name secret-key --value my-super-secretCreate a pipeline
Install the Pipeline plugin if you don’t already have it.
From the Jenkins home page, click 'New item', and then:
-
enter a name, i.e. 'key-vault-test'
-
click on 'Pipeline'
-
add the following to the pipeline definition:
pipeline {
  agent any
  environment {
    SECRET_KEY = credentials('secret-key')
  }
  stages {
    stage('Foo') {
      steps {
        echo SECRET_KEY
        echo SECRET_KEY.substring(0, SECRET_KEY.size() - 1) // shows the right secret was loaded, don't do this for real secrets unless you're debugging
      }
    }
  }
}You have now successfully retrieved a credential from Azure Key Vault using native Jenkins credentials integration.
configuration-as-code integration
The Configuration as Code plugin has been designed as an opinionated way to configure Jenkins based on human-readable declarative configuration files. Writing such a file should be easy without being a Jenkins expert.
For many secrets the credential provider is enough, but when integrating with other plugins you will likely need more than string credentials.
You can use the configuration-as-code plugin (aka JCasC) to allow integrating with other credential types.
configure authentication
As the JCasC plugin runs during initial startup the Azure Key Vault credential provider needs to be configured before JCasC runs during startup.
The easiest way to do that is via environment variables set before Jenkins starts up:
export AZURE_KEYVAULT_URL=https://my.vault.azure.net
export AZURE_KEYVAULT_SP_CLIENT_ID=...
export AZURE_KEYVAULT_SP_CLIENT_SECRET=...
export AZURE_KEYVAULT_SP_SUBSCRIPTION_ID=...
export AZURE_KEYVAULT_SP_SUBSCRIPTION_ID=...
See the azure-keyvault documentation for other authentication options.
You will now be able to refer to Azure Key Vault secret IDs in your jenkins.yaml file:
credentials:
  system:
    domainCredentials:
      - credentials:
        - usernamePassword:
            description: "GitHub"
            id: "jenkins-github"
            password: "${jenkins-github-apikey}"
            scope: GLOBAL
            username: "jenkinsadmin"
Thanks for reading, send feedback on twitter using the tweet button in the top right, any issues or feature requests use GitHub issues.
